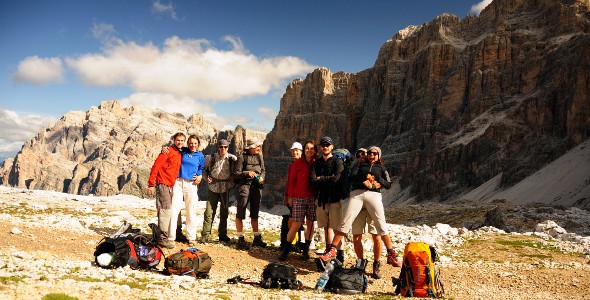
On Alpe di Lagazuoi with Forcella del Lago in the background
…he can’t keep up with the uphill scrambles and downhill slides.
Forcella is Italian for mountain pass and there was at least one everyday day of our trek along the Alta Via 1 this August. I spent six days on the classic Dolomites haute route with a group of friends. We walked (and swam) from Lago di Braies to Listolade. In the process we clambered up and slid down 13 of these forcellas.
Getting there
The Alta Via 1 starts at Lago di Braies near Dobbiaco/ Toblach in Sudtirol. We flew from London to Innsbruck with easyjet and then got a lift from Beni and Corinne who were driving from Switzerland. Otherwise, it is a three-hour train journey from Innsbruck to Dobbiaco.
See also: What to pack for the Alta Via 1
We spent two days in Cortina before the trek as our group of seven gradually came together. We were quite a disparate group; from those who can pull off a marathon to those who don’t usually do more than a walk between the car and the house door. We all managed fine and where somewhat faster than the walking times suggested in Gillian Price’s Trekking in the Dolomites AV1 guide (the times below are as we walked them).
Day 1: Lago di Braies (1,500m) – rifugio Pederu (1,548m)
Walking time: 5hrs; Ascent/ descent: 800/ 750m
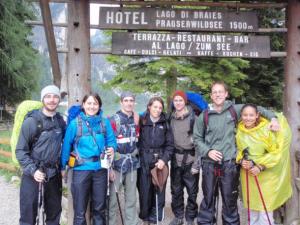
Lago di Braies: Ready to go!
After nearly missing our connecting bus in Dobbiaco, we arrived at Lago di Braies nice and early and set off on our six-day tour at 10am. As we walked along the lake we enjoyed the fact that it had stopped raining only to realise a second helping was due as we started the ascent towards rifugio Biella (2,300m). After three hours of a continuous uphill walk we passed through Forcella Sora Forno and shortly after that arrived at the hut.
Strengthened by picnic lunch and considerably cooled down by an icy wind that blew across the plateau around the hut, we set forth on the descent to rifugio Pederu. Two hours later we arrived at the rifugio. The descent was quite steep and felt rather long towards the end.
With double rooms and plush bathrooms, rifugio Pederu was more like a hotel than an Alpine hut.
Day 2: Rifugio Pederu (1,548m) – rifugio Scotoni (1,985m)
Walking time: 6hrs; Ascent/ descent: 920/ 500m
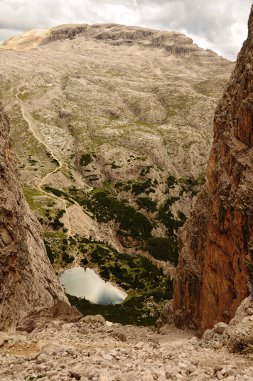
Lagazuoi Piccolo from Forcella del Lago
In the morning we started uphill again towards the highest point of the day – Forcella del Lago (2,486m). The ascent roughly broke-up into two sections: from Pederu to Fanes and then from a trail junction shortly after Passo Tadega towards the actual mountain pass.
We made good progress all the way to the Fanes Jausenstation shortly before the actual Fanes rifugio. It was a lovely wooden hut next to a river. In the strong morning sun and about 2,000m the clear river looked like the perfect plan for a morning swim. And so, a quick snack break turned into a swim break! Wow, it was cold! Like a thousand needles.
Thoroughly refreshed, we continued. From Fanes the path turned into a bit of a hikers’ highway with crowds heading in each direction. As soon as the path broke off steep uphill towards Forcella del Lago, the crowds disappeared. Which was good for us, but bad for them.
The one hour ascent was more than worth it when we arrived at the narrow and very pointed pass. Locked between the huge rock faces of Cima del Lago and Punte di Fanes the pass isn’t more than 20m wide and initially appears like an edge of an abyss. The downhill path drops down so steeply there is no sight of it from the top! The view on to the opposite Lagazuoi Piccolo that seems to be just an arm’s length away is simply stunning.
Several obligatory photos later, we were making our way down the zigzagging path to Lago di Lagazuoi and then further down (off the usual AV1 route) to rifugio Scotoni. We arrived at 4pm with plenty of time for pre-dinner beers and a chat with our two new arrivals Nora and Max.
Scotoni is a small hut with a nice homely feel. Now the nine of us filled up half the rooms. The hut is still quite luxurious for a mountain hut – with private bathrooms and hot showers.
Day 3: Rifugio Scotoni (1,985m) – rifugio Cinque Torri (2,137m)/ rifugio Scoiattoli (2,225m)
Walking time: 5hrs 30mins; Ascent/ descent: 1,000/ 800m
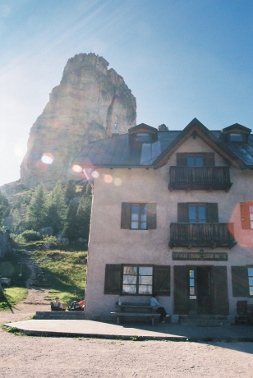
Rifugio Cinque Torri
As we started off on another day’s hiking, morning frost, a proof that it can get rather cold in the Alps even in August, lay all around. While the steep uphill back to Lago di Lagazuoi warmed us up very quickly, it got chilly again on the windy plain towards Forcella Lagazuoi. At 2,573m this was the highest point of the whole route and great views of the opposite Averau, Cinque Torri and Nuvolau opened up for the first time of the day.
The panorama trip continued as we walked along the huge Southern wall of the Tofana di Rozes. Croda da Lago appeared ahead and the snow covered Marmolada peaked out behind Lagazuoi. The sun was shining and many climbers were trying their luck on the Tofana routes. Two hours later when we arrived at Cianzope it turned out a couple of them needed the rescue helicopter.
At Cianzope our group shrank for the first time. Nora and Max went home again and Anna and Pavel returned to Cortina for some more via ferrata fun. Dolomitibuses run from Cianzope to both Cortina and Passo Falzarego.
The remaining five of us then practically ran up to Cinque Torri in a crazy pace that left me coughing (and swearing). After a beer and some speculation over whether Cinque Torri would become available for two more, Beni and Corinne moved on to the close by rifugio Scoiattoli where they had booked. This later on resulted into some mad running up and down the mountain as we tried to reunite for dinner. Note, there are three different paths between the two huts!
In the end it was dinner at Scoiattoli. It is a big modern hut with a proper restaurant and a stunning 270 degree view of the massifs around. Cinque Torri on the other hand is a much more traditional and smaller hut, used in World War One as a military post. While lacking the views of the Tofana and Lagazuoi, its position at the foot of the Cinque Torri is unique and the views of the opposite Croda da Lago quite impressive too.
Day 4: Rifugio Cinque Torri (2,137m) – rifugio Citta di Fiume (1,917m)
Walking time: 4hrs; Ascent/ descent 600/ 800m
Having learnt from the previous evening, we agreed a meeting point and set off from rifugio Cinque Torri towards Passo Giau. As we didn’t want to carry and rent the via ferrata kit required for the descent from Nuvolau to Passo Giau via Ferrata Ra Gusela we took a shortcut running along the side of Nuvolau. This definitely looked a lot more harmless on the map than it proved to be. Rather than a small gradual descent, it was a rollercoaster ride of short and steep ascents and descents alternating all the way to Passo Giau.
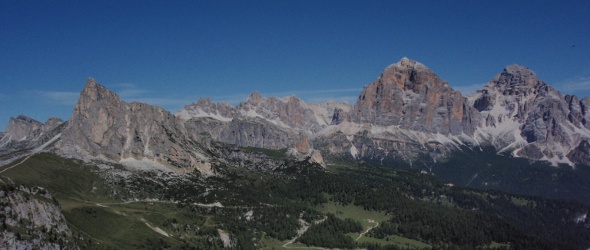
Forcella Giau: Looking back at two days of walking
Passo Giau was another parting point (with buses running to Cortina). After a coffee we said bye to Beni, Corinne and Felix. Just two of us continued first down and then very steeply up to Forcella Giau. This was a spot with the best panorama view of the whole trip – with our journey since day 2 traceable behind us. A while later we were at Forcella Ambrizzola and then started the descent to rifugio Citta di Fiume. In the end we arrived at the hut at the foot of the Pelmo incredibly early – at 2:30pm already.
All this time was perfect to enjoy the best Apfelstrudel on the AV1 yet, bask in the sun, plan the next two days and generally summon our energy for the mammoth hike the next day.
Citta di Fiume was the most Spartan hut yet, with proper dorm rooms and no freely flowing hot water (there was a coin operated shower though).
Day 5: Rifugio Citta di Fiume (1,917m) – rifugio Coldai (2,135m) via Sentiero Flaibani and rifugio Venezia
Walking time: 7hrs; Ascent/ descent: 1,150/ 950m
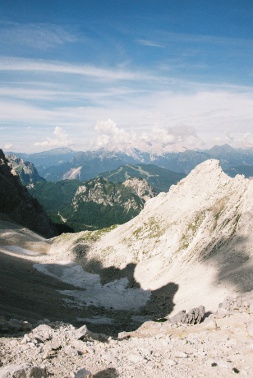
Val d’Arcia from its forcella
We got ready for an early start and nearly managed to leave at 8am – 8.10 it was in the end. Before long we were heading up scree and stones along Sentiero Flaibani towards Forcella Val d’Arcia. The map played tricks on us. It shows the path no. 480 as going up the main scree field, which it doesn’t. Just about not lost we climbed up.
The ascent continued steep up across a short stretch aided with ropes and ledges (not a via ferrata though) to a ridge below Cima Forada, which offered a short break and an amazing view back at Tofana di Rozes, Nuvolau and Croda da Lago. And, we even saw three chamois on the way there.
From then on it was a little bit downhill through scree before we hit the final steep ascent through rocks along an unclear path. At last we were at Forcella Val d’Arcia (2,476m). It opened up a view behind Pelmo towards Antelao and rows of ridges with thin pointy peaks still covered in the morning hue.
See also: How scary really is Sentiero Flaibani?
After a quick snack and a few photos we started ‘sliding’ down the very slippery scree slope. The scree was interrupted by a short clamber over the Pelmo rock face aided by cables, before it resumed again ahead of rifugio Venezia. We stopped for a coffee break there before marching along the Pelmo and then downhill to Palafavera. As clouds gathered overhead we pressed on fearing a rainy lunch break.
By the time we reached Palafavera we were becoming quite literally worn out. Constantin’s boots had a massive tear and my knee started playing up. Still, the chair lift from Palafavera half way up to Coldai did not get the better of us.
After lunch and some more coffee we started on the final leg of the day up to rifugio Coldai. As we set-off it was blue skies right, grey clouds left. Soon it turned out we were heading left. Two hours and a short summer shower later we were at rifugio Coldai.
Day 6: Rifugio Coldai (2,135m) – Listolade (680m) via rifugio Vazzoler
Walking time: 5hrs 30mins; Ascent/ descent: 100/ 1,400m
Leaving rifugio Coldai
We started nice and early on our last day – just after eight. However, rifugio Coldai was the first place of the whole tour where eight was late not early. Generally, it was the most ‘Alpine’ hut yet, as many use it as a base for trips to the Civetta summit. Nevertheless, a hot shower was still available for a fee and the menu was almost restaurant like.
Off we were though: down to Lago Coldai and along the Civetta towards Vazzoler. At some point we got a bit carried away, lost the numbered path and ended up walking along the scree at the foot of the Civetta massif. That took us through last year’s snow for the first time in the six days. We found our way again just around rifugio Tissi.
Another hour or so later we arrived at rifugio Vazzoler. The whole route from Coldai was easy and with just 3 hours walking time definitely too short for a full day trip as suggested in the classic route – even if the ongoing descent did feel long.
And this was just the beginning! From Vazzoler to Listolade we still had to descend some 1,000m! That was long. But, after two and a half hours of continuously walking down we arrived at Listolade.
The well deserved finishers beer tasted great and at 15.02 we were on the bus to Belluno. The Dolomitibus service runs nearly every hour Mondays to Saturdays, a less frequent service runs on Sundays.
Final notes
Difficulty
The Alta Via 1 (or at least its first half) is an easy Alpine trek. The daily trips (even as extended here) aren’t particularly long and with many other hikers and huts along the way, the commitment required isn’t high. There is nearly always someone else a few minutes ahead or behind. And, should a day get a bit tool long, there is probably a rifugio on the way to shorten the walk.
Accommodation
The rifugios are luxurious by Alpine standards, often more like hotels than shelters with a kitchen. One potential shortcoming of our route was the fact it avoided some of the higher lying huts (Lagazuoi, Nuvolau) that were most likely a lot simpler.
Supplies
- Water: drinking tap water was available at most huts, with the exception of rifugio Biella and Citta di Fiume.
- Food: the only opportunity to buy food (other than meals and snacks from the rifugios) along our route was on day 5 at the Palafavera campsite.
- Budget: around €50 a day per person for accommodation, breakfast and dinner. Cash only.
- Or check out my full packing list for the trip
… and thanks to Pavel for his photos!
Related posts
- The Alta Via 1 revisited: more trip reports
- Along the Alta Via 1 in six days: the route
- This year’s trek: Alta Via 1
- First five days of the Alta Via 2
Have you walked the Alta Via 1 or are you planning to? Leave a comment with your experience of the trip or its planning!

Brill blog. Ta.
Ta.
Hello,
Do you know if there is a place to leave luggage in Belluno for about 5 days? We hope to leave a couple of bags while we hike.
Maria
Hi Maria!
Thanks for stopping by. This is a good question. Unfortunately I don’t know the answer. I would try the train station in Belluno. There should be left luggage lockers there. Alternatively, if you are planning to overnight in Belluno, you could try your hotel/ b&b. Another option is leaving your luggage at the airport in Venice or Innsbruck.
Good luck with the rest of your trip planning!
marketa
Thank you Marketa for your prompt reply. Your blog will be very useful as we plan our trip and keep referring to the information you’ve posted.
With good wishes
Debbie x
Hi Marketa,
Thank you for this very helpful blog, so much important information.
A friend and I are planning the AV1 for the end of August beginning of September 2016 and wanted to ask you how far in advance do you need to book the huts ?
Thanks again
Debbie x
Hi Debbie! That’s a tricky one. I’d say that if you book in June for September, you should be absolutely fine. Even later is probably ok for September, but you never know. I think back in 2011 we booked about 6-8 weeks in advance, but we hiked in August when the trail is busier. Have fun planning the trip! marketa
and glad you find the blog helpful!
Hi there! Your website has been an incredible resource – thanks so much!
Many people recommend the Tabacco maps for Alta Via 1 but I don’t have them yet. I’ll be spending a couple of nights in Venice, then one night in Dobbiaco before starting on the trek in a couple of weeks. Will I be able to find a map easily in one of these two cities?
Thanks!
Hi Lauralee!
Glad the blog is useful. Always nice to hear that.
I also used Tabacco maps on the AV1. I think you should be able to get them in Venice (large book stores or big outdoor shops perhaps) or even in Dobbiaco. Dobbiaco is pretty small, but since it is the gateway to the Alta Via 1 they must sell them there (tourist office?).
Good luck with rest of the planning and enjoy your trip!
Best,
marketa
Thanks so much!
Hi Marketa, I am planning on doing this trek mid September with my 20 yr old son. How do I go about booking the huts? And do they not take deposits? Did you take food for lunches? We might be coming from Venice. Any Idea how to get from Venice to ? Cortinna? Thanks Christine
Hi Christine!
Thanks for stopping by on the marmot post!
All you need to do to book the huts in the vast majority of cases is to call them up. There are some numbers in the post about my av1 route http://bit.ly/1Jqytew. Some might ask you for a deposit, but you’ll find out when you call.
We did have our own lunches with us. You could also buy sandwiches for the day from the huts.
I think there should be a train service running between Venice and Dobbiaco. Try this site for timetables http://www.trenitalia.com/
Good luck with the rest of your trip planning!
marketa
hello! thank you very much for this webside. we are hking the alta via next week but we are a bit worried about the aided stretch next to nuvolo ´- some people say it is fine, some people dont 🙂 i would rather avoid it but we have booked into nuvolau already. i have read that you have found a short cut to passo giau from nuvlau – can you tell us more about it? how did you find it? sadly not mentioned in the cicerone guide book. we r going next week and we know it is short notice but would REALLY some words from you RE this “aided section”buisness. we would all sleep lighter 🙂
kind regards
Mel
Hi Mel!
I’m glad you like the blog!
The aided section at Nuvolau is an easy via ferrata. If you want to go that way you should use a via ferrata set. We met a group of hikers at Citta di Fiume, who did the ferrata without any kit. They made it, but said they would not do it again.
We took the trail from Rifugio Cinque Torri to Passo Giau. You will have to hike back a little bit from Nuvolau, but it’s not far. Unfortunately I don’t have the map anymore to give you the path number, but there should be only one trail from Cinque Torri to Passo Giau.
I hope this helps. Enjoy your trip next week! It’s a great trek. Are you walking all the way to Belluno, or only part of the way?
Marketa
Hi,
Great blog. Really helpful. I am planning to do the AV1 in the next couple of weeks with my wife. We’ve never been to the Dolomites before. Did you guys take ropes and karabiners. I’ve heard there are a couple of sections which might need them. We would plan to walk down to the Agorda valley rather than the via ferrata section at the end.
Thanks
Daniel
Hi Daniel,
Thanks. I’m glad you find my AV1 posts useful. If you are going to avoid the via ferrata then you don’t need any kit. Otherwise you’d need a harness, a via ferrata set and a helmet. Aside from the via ferrata section towards the end of the trek, which you mention, there is also a short and easy via ferrata going down from Nuvolau. We avoided that section, but met a group of Germans who did it without any kit. Though they also said they wouldn’t want to do it again. 🙂 I’d recommend avoiding it and trekking light.
I hope this helps. Good luck with the rest of the trip planning!
Marketa
Hello Marketa,
We’re wondering if it’s possible to do the Alta Via 1 in June. Any thoughts?
Andrew.
Hi Andrew,
June should be fine for the Alta Via 1. You’ll probably come across snow in some parts, but it should be fine. The guides usually say that Alpine trails are walkable without greater difficulties between June and September.
Have a great time if you decide to do it!
Marketa
Hi Marketa,
Thanks for all this information, it has been a godsend. My brother & I leave on saturday to do a route based on yours and I’m very much looking forward to it. I two questions, did you take any food with you or was it possible to survive on provisions from the rifugios? Did you use any water purification system?
Thanks for all of your help,
Tom
Hi Thomas,
Thanks for your comment! It’s always nice to get enthusiastic feedback 🙂
We carried our lunches with us, but it was more to do with saving money than anything else. You can pick-up lunch packs at rifugios. Plus there was a rifugio somewhere on the way everyday.
I used water purification tablets I bought at a normal outdoor shop (Blacks if you’re from the UK). Nothing more elaborate.
Have a great trip!
marketa
Great post!
My name is Steffen and I plan to hike the Alta Via 1. Because I wil get to Lago di Braies by car I hope you can help me with these questions:
– Is it possible to park near the starting point of the route?
– Is there a fee for parking?
– Is it possible to park for 5 days (without staying at a hotel)?
I plan to hike for 5 days, which should lead me to about stage 5 of the Alta Via 1. This means that I would end up at Rif. Citta di Fume. Do you know an easy way to get back to the car near Lago di Brais? Or should I aim for another place to end my trip, where its easier to get back to my car. I find it very difficult to figure out how to get back by bus!
I will be very thankful for your answers.
With best regards,
Steffen
Hi Steffen,
Thanks for your comment. Great to hear you like the post.
I can’t quite remember it, but there should be a parking lot at Lago di Braies (it says so on the map and in Gillian Price’s Alta Via 1 guide). Gillian Price also mentions there’s a fee for the parking, but discounted for long term stays.
If you’re finishing at Citta di Fiume you can probably get a bus from Passo Staulanza. It might be easier to leave your car somewhere less remote than Lago di Braies though. Cortina worked well for us.
Good luck with the rest of the planning and have a great time!
Marketa
Hi thanks for posting all this info, heading over in two weeks time from Ireland and looking forward to it
Enjoy the trip and thanks for the comment! I wish I was going again.
Hello!
My name is Sergey Shishigin. I am a traveller from Saint-Petersburg, Russia. Me and my friends will hiking in Dolomites Alta Via 1 at the end of August.
We have found your report. It is useful for our preparation for travel. Thanks for it.
We have a question about your route. Could you answer it, please?
On the day 5 (Refugi Città di Fiume (1.918 m) – Refugi Coldai (2.135 m)) you passed Forcella di Val d’Arcia on the way from Refugi Città di Fiume to Refugi Venezia near Monte Pelmo. Did you use any equipment? What’s the difficulty of this part of track?
We will be appreciate for any answer.
Thank you.
Hi Sergey,
Thanks for your comment. I’m glad you find my blog useful!
The route over Forcella Val d’Arcia, was more difficult than the other passes we went through last year, but it can be done without any special equipment. There are couple of very short sections secured with ropes, but these are not via ferrata. You will need good stamina, walking confidence and a head for hights, but nothing special beyond that. The route is just steep (both up and down) and goes through a lot of scree.
Otherwise, you can have a look at my post What to pack for the Alta Via 1, which shows what I took with me last year …. minus the via ferrata kit (we avoided any via ferrata, so didn’t carry the equipment).
Good luck with the rest of your trip planning and enjoy the trip!
Marketa
Hello, Marketa!
Thank you for reply.
So, we will do this stage too if weather will be ok.
I hope it’ll be an exciting part.
Thank you for advice about equipment list in your blog.
We have taken note of some points (for example, ear plugs 🙂 ).
Have luck in further travels too.
—
With best regards,
Sergey.